Installing marine solar panels on your boat not only provides a reliable and sustainable power source but also offers the freedom to explore remote locations without relying solely on traditional fuel-powered systems.
1. Assessing Power Needs and Planning
Before beginning the installation process, it is crucial to assess your power needs and determine the energy requirements of your boat. Consider the electrical systems, appliances, and devices that will be powered by the solar panels. This evaluation will help you determine the size and number of panels needed to meet your power demands. Additionally, consider the available space on your boat for panel placement and ensure it receives ample sunlight throughout the day. Careful planning at this stage will ensure an efficient and effective solar panel installation.
2. Choosing the Right Solar Panels
Selecting the right marine solar panels for marine applications is vital for optimal performance and longevity. Look for marine-grade panels specifically designed to withstand the harsh marine environment. These panels are built with features such as waterproofing, corrosion resistance, and durability. Additionally, consider the efficiency ratings and power output of the panels to ensure they can generate sufficient electricity for your boat’s needs. Monocrystalline and polycrystalline panels are popular options due to their high efficiency and reliability.
3. Mounting Options and Placement
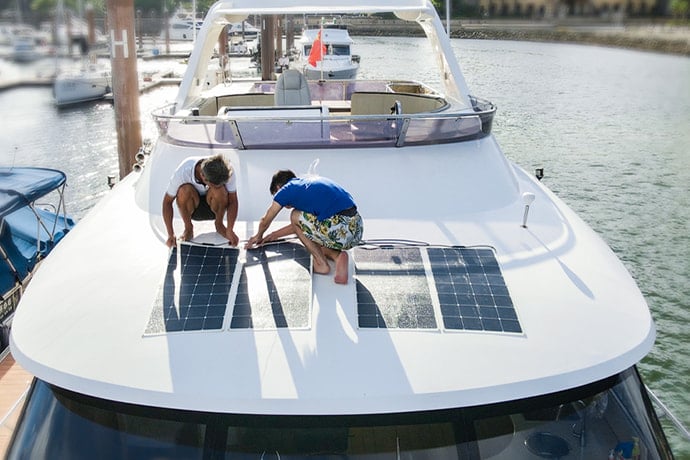
Determining the ideal mounting option and panel placement is critical for maximizing sunlight exposure and optimizing energy production. There are various mounting options available, including fixed mounts, tilting mounts, and flexible mounts. Fixed mounts are the most common and straightforward option, but tilting mounts allow you to adjust the angle of the panels to optimize solar capture. Flexible mounts are ideal for curved surfaces or irregular boat shapes.
When selecting the panel placement, consider the available space on your boat’s deck or roof. Aim for unobstructed areas with direct sunlight exposure. Avoid shading from antennas, masts, or other equipment that may hinder the panels’ performance. Additionally, ensure sufficient airflow around the panels to prevent overheating.

4. Installation Process
The installation process involves several key steps:
4.1. Secure Mounting: Begin by securely mounting the solar panels according to the chosen mounting option. Follow the manufacturer’s instructions for proper installation, using suitable brackets, adhesive, or screws. Ensure the panels are firmly attached to withstand the marine environment.
4.2. Wiring and Connections: Connect the solar panels to a charge controller using appropriate cables and connectors. The charge controller regulates the charging process and prevents overcharging of the boat’s battery bank. Run the cables from the panels to the charge controller and from the charge controller to the battery bank, ensuring proper sizing and cable management.
4.3. Battery Bank Setup: Properly connect the battery bank to the charge controller, adhering to the manufacturer’s guidelines. Ensure the battery bank is in a well-ventilated and secure location.
4.4. Monitoring and Safety: Consider installing a monitoring system to track the performance of your marine solar panels and battery bank. This allows you to monitor energy production and battery levels, ensuring optimal efficiency. Additionally, incorporate safety measures such as fuses or circuit breakers to protect the system from overloads or short circuits.
5. Maintenance and Care
Regular maintenance is essential to ensure the longevity and optimal performance of your marine solar panel system. Here are some key maintenance tasks to keep in mind:
5.1. Cleaning: Regularly clean the solar panels to remove dirt, dust, and debris that can reduce their efficiency. Use a soft brush or sponge with mild soap and water to gently clean the surface. Avoid using abrasive materials or harsh chemicals that can damage the panels.
5.2. Inspection: Conduct routine inspections of the panels, mounts, and wiring connections to identify any signs of damage, loose connections, or corrosion. Address any issues promptly to prevent further injury or power disruptions.
5.3. Sealing and Waterproofing: Ensure that all mounting brackets, connectors, and wiring connections are properly sealed and waterproofed. This prevents water intrusion and protects the system from corrosion and electrical issues.
5.4. Shade Management: Regularly trim nearby branches or obstructions that may cast shadows on the panels, reducing their energy production. Keeping the surrounding area clear ensures maximum sunlight exposure.
5.5. Battery Maintenance: Follow the manufacturer’s guidelines for maintaining and caring for your boat’s battery bank. This may include regular checks of electrolyte levels, equalization charging, and monitoring for signs of battery deterioration.
By following these guidelines and ensuring proper maintenance, you can harness the sun’s power to meet your boat’s energy requirements while minimizing your carbon footprint. Embracing renewable energy on the water benefits the environment and offers you the freedom to explore off-grid locations and enjoy a more self-sufficient and sustainable boating lifestyle.
Article from: https://www.sungoldsolar.com/
Your most sincere solar partner – Sungold


