How To Mount Flexible Solar Panels to a Minivan Camper can significantly enhance your journey’s freedom while providing you with a continuous supply of green energy. However, despite the seemingly straightforward process, there are numerous details and challenges hidden beneath the surface. A slight misstep could potentially affect the performance and lifespan of the solar panels. In this article, we will delve into how to overcome these challenges, ensuring that your installation of flexible solar panels not only achieves optimal results but also avoids common pitfalls. Whether you are a first-timer or an experienced camper van enthusiast, this article will offer practical advice and tips to help you effortlessly set up an efficient solar power system. Additionally, we will address some frequently asked questions about flexible solar panels and their advantages.
Steps on Mounting Flexible Solar Panels on a Minivan Camper
Step 1.Roof Features and Initial Preparations
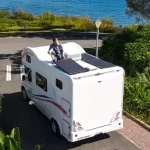
The roof of a van is often not entirely flat; for example, the roof surface of the Pacifica model has raised channels. It is unwise to attach solar panels directly to the roof, as this could lead to poor heat dissipation, thereby reducing the performance of the panels. To better secure and protect the panels, it is advisable to add some cushioning material, such as plastic sheets, underneath the panels.
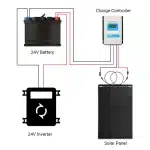
Choosing the right panel is crucial when installing solar panels. The Sungold 200W flexible solar panel is an excellent choice for camper vans. Its lightweight design not only makes it easy to install but also allows it to perfectly conform to the curved surface of the roof. Its high energy conversion efficiency ensures that your daily electricity needs are adequately met, providing stable power output even on cloudy days or under suboptimal lighting conditions. For van owners looking to enhance efficiency and simplify the installation process, the Sungold 200W is undoubtedly an ideal choice.
Step 2.Selecting the Appropriate Mounting Method
While there are numerous methods available for securing solar panels, not all are suitable for the roof of a small van. For instance, some people have attempted to use magnets or clips to secure the panels, but these methods often prove ineffective and may even result in the panels detaching during transit. To ensure the panels are securely fastened, it is recommended to use a strong double-sided adhesive tape, such as VHB tape. This tape can be used to attach a plastic board to the roof, onto which the solar panels can then be mounted.
Step 3: Ensure Secure and Stable Installation
During the installation process, it is essential to measure the dimensions of the roof and take into account any curvature. Although the surface may appear slightly uneven, the key is to align the panel with the raised sections of the roof to ensure a stable installation. You may use a jigsaw or table saw to cut the plastic sheet, allowing it to better conform to the shape of the roof. Wherever possible, apply a single continuous piece of tape at the front end to enhance stability. If you must apply the tape in sections, make sure each piece is closely joined for maximum adherence.
Step 4: Cleaning and Detailing
Before applying the tape, it is essential to thoroughly clean the roof. Using an alcohol spray and a microfiber cloth is an effective way to remove dust and dirt, ensuring the tape adheres properly. If only certain areas are cleaned, it may compromise the tape’s adhesion, which could affect the overall installation quality.
Step 5:Cable Management and Protection Measures
After installing the solar panels, it’s essential to properly manage the cables. It is recommended to use waterproof tape or plastic sheathing to protect the cables and secure them to the roof. Additionally, after rainfall, it’s important to check the roof for any signs of leaks to ensure that the installation of the cables and panels does not result in water entering the vehicle.
Step 6:Reserved Space and Future Improvements
When installing panels, it’s important to consider whether space needs to be reserved for other equipment, such as a Starlink antenna. If such a requirement exists, planning the placement of the panels in advance is crucial. After installation, if you notice an improvement in electricity usage, you might consider further optimizing your solar system, such as by increasing battery capacity or installing additional flexible solar panels.
Summary and Recommendations
By employing proper installation methods and thorough preparation, flexible solar panels can significantly enhance the efficiency and convenience of camper vans. If you have successfully installed solar panels, we encourage you to share your experiences and recommendations in the comments section. For those still considering installation, the tips and methods provided in this article will help you avoid common pitfalls and ensure the long-term stable operation of your system.